
How to Make Yogurt with a Yogurt Maker: The Ultimate Step-by-Step Guide
Making your own yogurt at home is easy, cost-effective, and allows you full control over ingredients. While you can use an oven or a cooler, an electric yogurt maker guarantees consistent results by maintaining the perfect temperature effortlessly.
Why Use a Yogurt Maker?
The key to great yogurt is keeping milk at a specific warm temperature (around 40-43°C / 105-110°F) for several hours so the beneficial bacteria can ferment the milk sugars. An electric yogurt maker, like the excellent Rommelsbacher JG 40, handles this crucial step automatically, ensuring thick, creamy, and successful yogurt every time.
What You Need (Checklist)
🥛 Ingredients:
- 1 Liter Milk: Whole (full-fat) milk yields the creamiest results.
- Yogurt Starter: Either a freeze-dried starter culture OR 2-3 tablespoons of plain, fresh yogurt with live cultures.
🥄 Equipment:
- Yogurt Maker: We recommend the Rommelsbacher JG 40.
- Saucepan & Thermometer.
- Whisk.
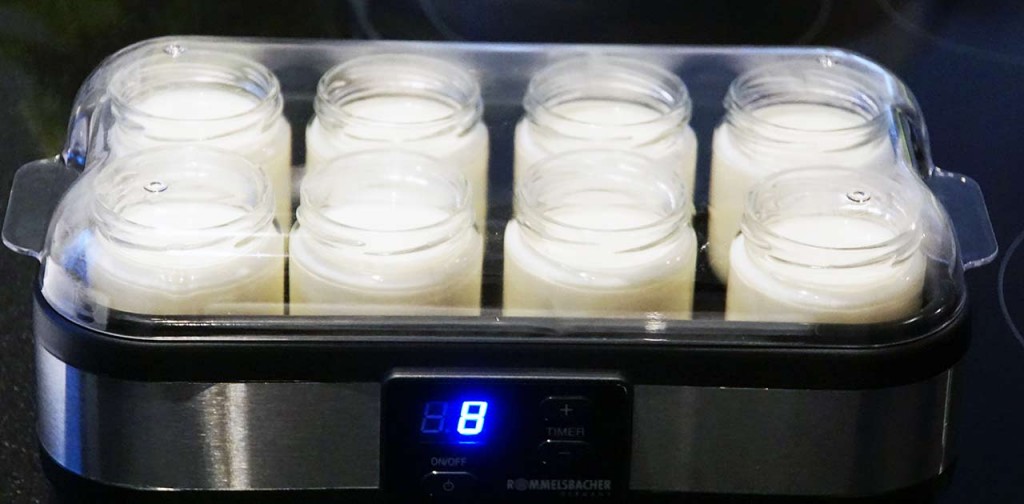
The Rommelsbacher JG 40 makes the process effortless.
The Recipe: Step-by-Step
1
Heat the Milk (85°C / 185°F)
Pour the milk into a saucepan. Heat it gently to around 85°C (185°F), stirring frequently to prevent scorching. Do not let it boil vigorously. This heating step kills competing bacteria and changes the milk proteins so they set into a thicker yogurt later.
2
Cool Down (Crucial Step!)
Remove the milk from the heat and let it cool down to the incubation temperature: between 40°C and 43°C (104°F – 109°F). Use a thermometer to be precise. This is critical: if the milk is too hot, it will kill your starter bacteria, and the yogurt will not set.
3
Add the Starter
Once cooled, scoop out a cup of the warm milk into a separate bowl. Add your starter (either the freeze-dried powder or 2-3 tablespoons of existing yogurt) to this cup and whisk thoroughly until smooth. Pour this mixture back into the main saucepan of milk and whisk gently to distribute evenly.
4
Incubate (8-10 Hours)
Pour the milk mixture into the jars provided with your yogurt maker. Place the jars (usually without their individual lids) inside the machine, put the main cover on the machine, and turn it on. Let it ferment undisturbed for 8 to 10 hours. The longer it ferments, the thicker and tarter it becomes.
5
Chill & Enjoy
Turn off the machine, remove the jars, screw on their individual lids, and place them in the refrigerator for at least 4 hours to set completely. Don’t forget to save a few tablespoons from this batch to act as the starter for your next one!
All About Yogurt Starters
A “starter” is simply a collection of beneficial bacteria that consume milk sugars (lactose) and convert them into lactic acid. This acid thickens the milk and gives yogurt its tangy flavor.
While you can use a spoonful of store-bought yogurt, we highly recommend using a dedicated freeze-dried starter culture for consistent, high-quality results.
Why Choose Our Freeze-Dried Starter?
If you are looking for a no-fuss starter that produces thick, creamy, and fantastic yogurt, this is the one to get. Our starter contains lactic acid bacteria extracted from natural sources in Bulgaria’s biologically conserved zones.
It is an “Heirloom” culture, meaning it is highly long-lasting. You can reuse a spoonful from your previous batch to start a new batch many times over, unlike many single-use store-bought yogurts.
A Note on “Heirloom” Varieties (Mesophilic vs. Thermophilic)
There are many types of traditional “heirloom” yogurts from around the world. It’s important to know the difference:
- Thermophilic (Heat-Loving): These require constant warmth (40-43°C) and are ideal for yogurt makers. Examples include traditional Bulgarian and Greek yogurt.
- Mesophilic (Room-Temperature): These ferment at average room temperature (around 20-25°C) and do not need a yogurt machine. Examples include Scandinavian varieties like Filmjölk, Viili, and Matsoni. These often have a thinner, more drinkable consistency.
For the Rommelsbacher machine described in this guide, you should always use a thermophilic culture.


