
How to make authentic milk kefir?
How to Make Milk Kefir at Home (Step-by-Step Guide)
Making your own authentic milk kefir is surprisingly easy. With just two ingredients—milk and live kefir grains—you can brew a delicious, creamy probiotic drink right on your kitchen counter. Follow our simple guide below.
What You Need (The Checklist)
🥛 Ingredients:
-
Milk Kefir Grains (1 tsp approx.): Live, active grains are essential. Do not use a powdered starter. -
Fresh Milk (250ml – 500ml): Whole, organic cow’s or goat’s milk works best. Avoid lactose-free or ultra-pasteurized (UHT) milk for the best results.
🥄 Equipment:
-
Glass Jar: A standard 0.5L to 1L jar. -
Breathable Cover: A coffee filter, paper towel, or clean cloth secured with a rubber band. (Do not use an airtight lid during fermentation). -
Plastic or Nylon Sieve: To strain the grains. Avoid metal if possible, although stainless steel is generally okay for brief contact. -
Plastic or Wooden Spoon & Collection Bowl.
The 4-Step Brewing Process
1
Combine Grains & Milk
Place your milk kefir grains into your clean glass jar. Pour the fresh milk over them. A good starting ratio is about 1 teaspoon of grains per cup (250ml) of milk. Do not fill the jar completely; leave some headspace at the top.
2
Cover & Ferment
Cover the jar with your breathable cloth or coffee filter and secure it with a rubber band. This keeps fruit flies out while allowing gases to escape. Place the jar in a quiet spot out of direct sunlight at room temperature (ideally 20°C – 25°C / 68°F – 77°F).
Let it ferment for about 24 hours. Fermentation will be faster in summer and slower in winter.
3
Check & Harvest
How do you know it’s ready? Gently tilt the jar. The milk should be thickened to the consistency of drinkable yogurt. You may see small pockets of clear yellow liquid (whey) separating near the bottom—this is normal and means it’s definitely done!
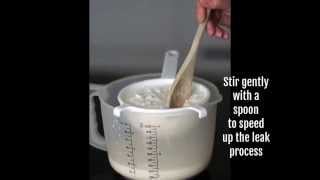
Place your sieve over a clean bowl. Pour the entire contents of the jar into the sieve. Use your plastic spoon to gently stir the kefir through the sieve, leaving the grains behind.
4
Enjoy & Repeat
The thickened liquid in the bowl is your finished milk kefir! You can drink it straight, chill it, or blend it with fruit for a smoothie.
Take the grains trapped in the sieve and immediately place them back into your jar (no need to wash the jar every time). Add fresh milk, cover, and start the process all over again for tomorrow’s batch!
Watch the Process
Video: How to make milk kefir – YouTube
Milk Kefir FAQ: Common Questions
How do I take a vacation from kefir-making?
Why is there a yellow liquid layer (whey) separating?
Why should I avoid metal?
What are kefir grains exactly?
Get Everything You Need to Start Today
Don’t have grains or the right tools? Get our complete Milk Kefir Starter Kit, delivered fresh to your door across Europe.
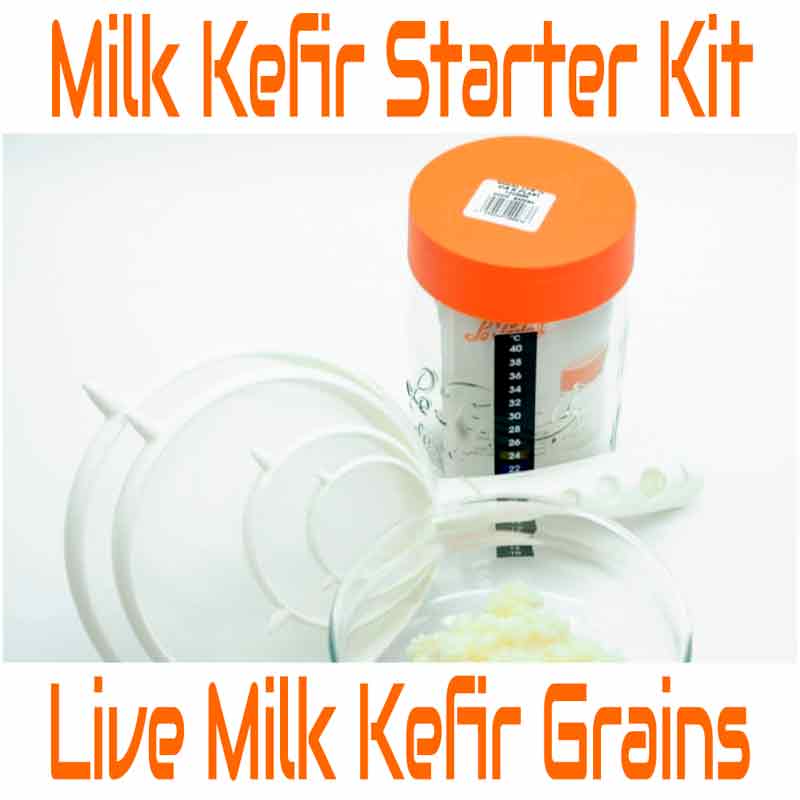
The Kit Includes:
- ✅ 10g Fresh, Live Milk Kefir Grains (guaranteed active)
- ✅ Plastic Strainer set (safe for grains)
- ✅ Fermentation Jar
- ✅ Adhesive Thermometer Strip (to monitor temperature)
- ✅ Detailed Instructions


